
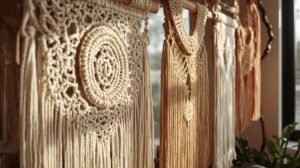
Macrame is one of those hobbies that instantly draws you in. It’s creative, relaxing, and the process of tying knots can feel almost meditative. But if you’re new to it, you might be asking yourself: “How much does it actually cost to start Macrame?”
The truth is, your investment really depends on the kind of projects you want to make. Some crafters love to jump into large wall hangings or intricate designs, while others start small with coasters, keychains, or plant hangers. The best part? You don’t need a big budget to give Macrame a try. With just a few simple tools and some cord, you can start creating right away. As your skills grow, you can slowly add more supplies or upgrade your materials.
In this post, I’ll break down what you actually need to get started, what kind of costs you can expect, and share a few budget-friendly tips so you can enjoy Macrame without overspending.
__________________________
This post contains affiliate links, which means I may earn a small commission if you make a purchase through them, at no extra cost to you. It’s a simple way to support my tutorials and keep the creativity flowing. Thank you for being part of my Macrame journey!
__________________________
The Basic Investment for Beginners
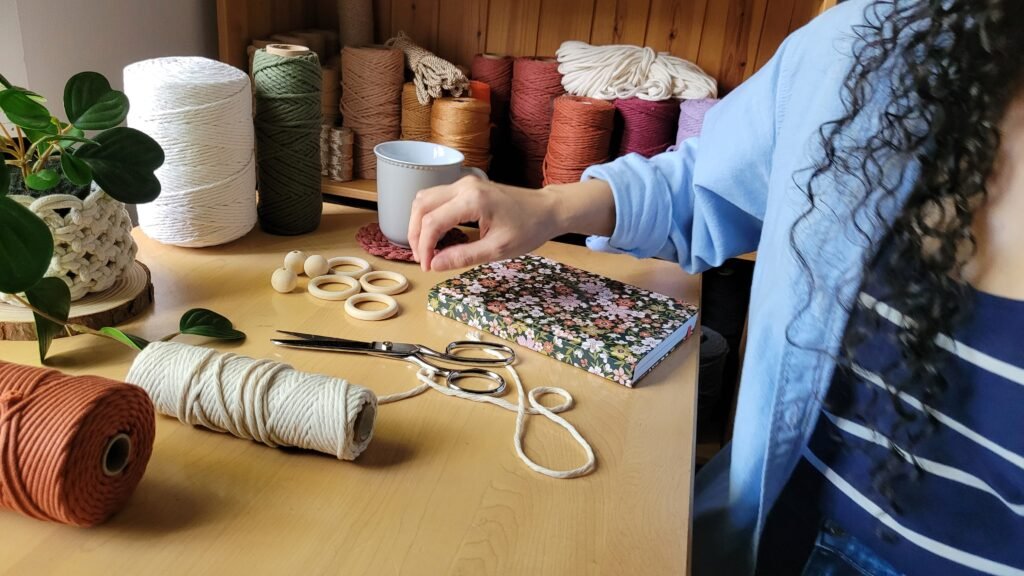
One of the best things about Macrame is that you don’t need a big shopping list to get started. A few simple supplies are enough to create your first piece, and you might already have some of them at home!
In this section, we’ll go over the basic materials every beginner should know about: the cords that bring your design to life, the supports that hold your work while you knot, and the tools and accessories that make the process smoother (and more fun).
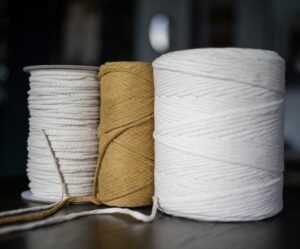 Choosing Macrame Cords:
Cords are the heart of Macrame, and they’re also where your budget can vary the most. Interestingly, single strand cords are often more expensive than 3-ply cords — even though they look simpler at first glance. Here’s a friendly breakdown to help you decide:
-
- Single strand cord: Soft, silky, and easy to brush out for fringes. These cords give your wall hangings and delicate projects that flowing, dreamy look. Because of the extra processing and soft texture, they tend to cost a bit more—but many makers feel it’s worth the investment for special pieces. You can check out my favorite single strand cotton cord here, if you want that soft, brushed finish.
-
- 3‑ply cord: Made of three strands twisted together, this cord is chunkier, sturdy, and holds knots beautifully. It’s usually more affordable than single-twist, making it a great choice for beginners or for projects like plant hangers, coasters, or baskets. This 3-ply Macrame cord is a great beginner-friendly option that I use all the time to practice.
-
- Braided cord: Very strong and durable, but harder to unravel for fringes. This one tends to be pricier than standard cotton, but it’s perfect for heavy-duty projects like bags or outdoor décor. Here is my favorite braided cord so far.
Budget tip: For beginners, a small versatile, roll of 3‑ply cord is usually the most practical choice—it’s easy to work with, and won’t strain your budget. Once you’ve practiced a few knots and are ready to make something extra special, you can treat yourself to a spool of soft single-twist cord to add that delicate, flowing touch.
By understanding the differences between cord types and their costs, you can make smarter choices and enjoy Macrame without overspending — while still creating beautiful results.
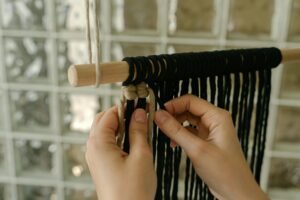
Choosing the right Macrame Support:
Every Macrame project needs something to anchor your cords — but don’t worry, you don’t need a fancy setup to start knotting! There are plenty of simple options you can use, depending on the size of your project and what you already have at home.
I actually work in a small space, so for most of my projects, I use a corkboard and a handful of pins to keep everything in place. It’s simple, affordable, and works like a charm. When I’m making wall hangings, I switch to a wooden dowel, which makes it easy to hang and see how the design is coming together.
-
- Wooden dowels: These are the most common supports for wall hangings. They’re inexpensive, easy to find at craft stores, and give your projects a clean, modern look.
-
- Natural branches: If you want something unique and rustic, a smooth branch from your backyard makes a beautiful base. Just make sure it’s sturdy and clean before using it.
-
- Clothes hangers or rods: A simple hanger, curtain rod, or even a tension rod between two walls can work perfectly, especially for practicing knots or making small hangings.
-
- Boards (corkboard or foam board): Great for small projects! You can pin down your cords to keep them in place while you work, which is especially handy when you’re learning new knots. This is a corkboard ideal for keychain, coasters, small placemat. It keeps the cords secure and makes knotting so much easier.
-
- Macrame stands or racks (optional): Some makers invest in a proper Macrame stand later on, which makes it easier to work on larger projects. But this is totally optional—you definitely don’t need one to begin.
The key is to use what feels comfortable and practical for you. Start with what you already have at home, and upgrade later if you feel the need.
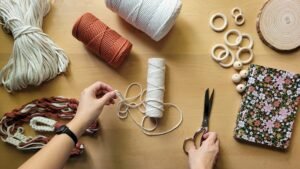 Choosing the right Macrame tools and accessories:
You don’t need much to get started, but a few tools can make your Macrame journey a lot easier (and more fun!).
- Essentials: A sharp pair of scissors and a tape measure or ruler are must-haves, and you probably already have these at home. Sharp scissors keep your cord ends neat and clean, while dull blades can fray your cord and make cutting frustrating. I use these scissors and they’ve stayed sharp through so many projects. A tape measure or ruler helps you get consistent lengths.
- Optional extras: As you explore more projects, you might want to add tools like tapestry needles, beading tools, a small comb or brush for soft fringes, or accessories like wooden rings, keychain hooks, and beads. These little extras make finishing and decorating your pieces easier, but they’re not essential for your very first projects. You can find a great pack of wooden rings here if you’re making plant hangers or ornaments, and a pack of keychain hooks here.
With just a few basic supplies — cord, a support, and a pair of scissors — you can start creating beautiful Macrame pieces like coasters or keychains right away. Once you’ve made a few, you’ll naturally figure out which tools you enjoy using the most.
Friendly tip: If you’d like a little shortcut to get started, DIY kits are a fun way to dive straight into knotting, and create cute keychains, coasters, or even small plant hangers. You can shop for DIY Kits here.
How Costs Can Grow With Projects
Just like any craft, the cost of Macrame can increase as your projects get bigger, more intricate, or more specialized, but don’t worry, you can always pace yourself and grow gradually. Here’s what typically drives the cost up:
-
- Larger projects: Statement wall hangings, room dividers, or big plant hangers naturally require more cord. This might mean buying bigger bundles, multiple rolls, or even higher-quality cords to support the weight and structure.
-
- Different cord types and thicknesses: While standard cotton 3‑ply cord is usually affordable, thicker ropes, braided cords, or soft single-twist cords tend to be pricier. Choosing these types for special textures or flowing finishes can increase your costs.
-
- Accessories and embellishments: Beads, wooden or metal rings, keychain hooks, and other decorative items can make your pieces unique. Individually, they’re often inexpensive, but larger or more complex projects may require several, which can add up.
-
- Optional tools for finishing: Tapestry needles, combs, and beading tools are not required for basic Macrame, but for larger or more detailed projects, they can make a big difference in the final look, and can be another small investment.
Pro tip: You don’t have to buy everything at once. Start with what you need for your first few projects, then slowly expand your collection of cords, supports, and accessories as your confidence and skills grow. This way, you can enjoy macramé without feeling overwhelmed by upfront costs.
Budget-Friendly Tips for Starting Macrame
Starting a new hobby can sometimes feel expensive, but the great thing about macramé is that you can get creative without spending a fortune. Here are some practical tips to help you enjoy the craft on a budget:
-
- Start small: Begin with simple projects like coasters, keychains, or small plant hangers. These projects use less cord, are quicker to finish, and give you the perfect opportunity to practice new knots without committing to a big investment. Plus, finishing a project quickly feels rewarding and keeps your motivation high!
-
- Repurpose materials: Don’t be afraid to get creative with what you already have at home. Old t-shirts, scarves, or fabric scraps can be cut into strips and used as practice cords. It’s a fun way to recycle materials while learning the basics — and it adds a unique, personal touch to your pieces.
-
- DIY supports: You don’t need to buy fancy dowels or stands. Branches from your backyard, sturdy sticks, curtain rods, or even clothes hangers make excellent supports for small or medium projects. Experimenting with different types of supports can also add charm and character to your macramé creations.
-
- Buy in bulk (when ready): Once you’ve practiced a few projects and know that macramé is a hobby you enjoy, consider buying cord in larger rolls or bundles. It’s usually cheaper per meter and ensures you always have material on hand for new projects.
-
- Get creative with tools: Simple household items can double as macramé tools. Crochet hooks, knitting needles, chopsticks, or even a pencil can help tuck in loose ends, pull knots tight, or assist with intricate details—saving you from buying specialized tools until you really need them.
Extra tip: Combine these ideas! For example, you can practice with repurposed fabric on a branch from your yard while using a crochet hook to finish your knots. Small, budget-friendly choices like this make learning fun and stress-free.
With a little imagination and resourcefulness, you can enjoy Macrame without feeling pressured to invest heavily upfront. Every knot you tie is a step toward mastering the craft, and creating something beautiful along the way.
__________________________
Final Thoughts
At the end of the day, Macrame is as affordable or as fancy as you want it to be. You can keep it simple with just a roll of cord and a pair of scissors, or explore higher-quality materials and larger projects as you grow. What makes this craft so special is that it doesn’t take much to get started, but it always leaves room for you to experiment, practice, and make it your own.
So if you’ve been curious about trying Macrame, don’t let the cost hold you back. Start small, use what you have, and enjoy the process. Every knot you tie is a step toward building your skills, your confidence, and of course, your beautiful handmade creations.
💛 If you’d like some inspiration to get started, check out my tutorials and patterns or share your own creations with me on Instagram @studio_atk. I’d love to see what you’re making!
Want to get started quickly and easily?
I’ve created starter kits that include what you need to make your first keychain or coaster. Each kit comes with pre-cut cords, and optional accessories, perfect for beginners who want to dive right in and start practicing knots.
Shop the Starter Kit →
These kits are a fun, budget-friendly way to jump into Macrame without worrying about gathering supplies. You’ll be creating your first piece in no time, and having a blast along the way!


